
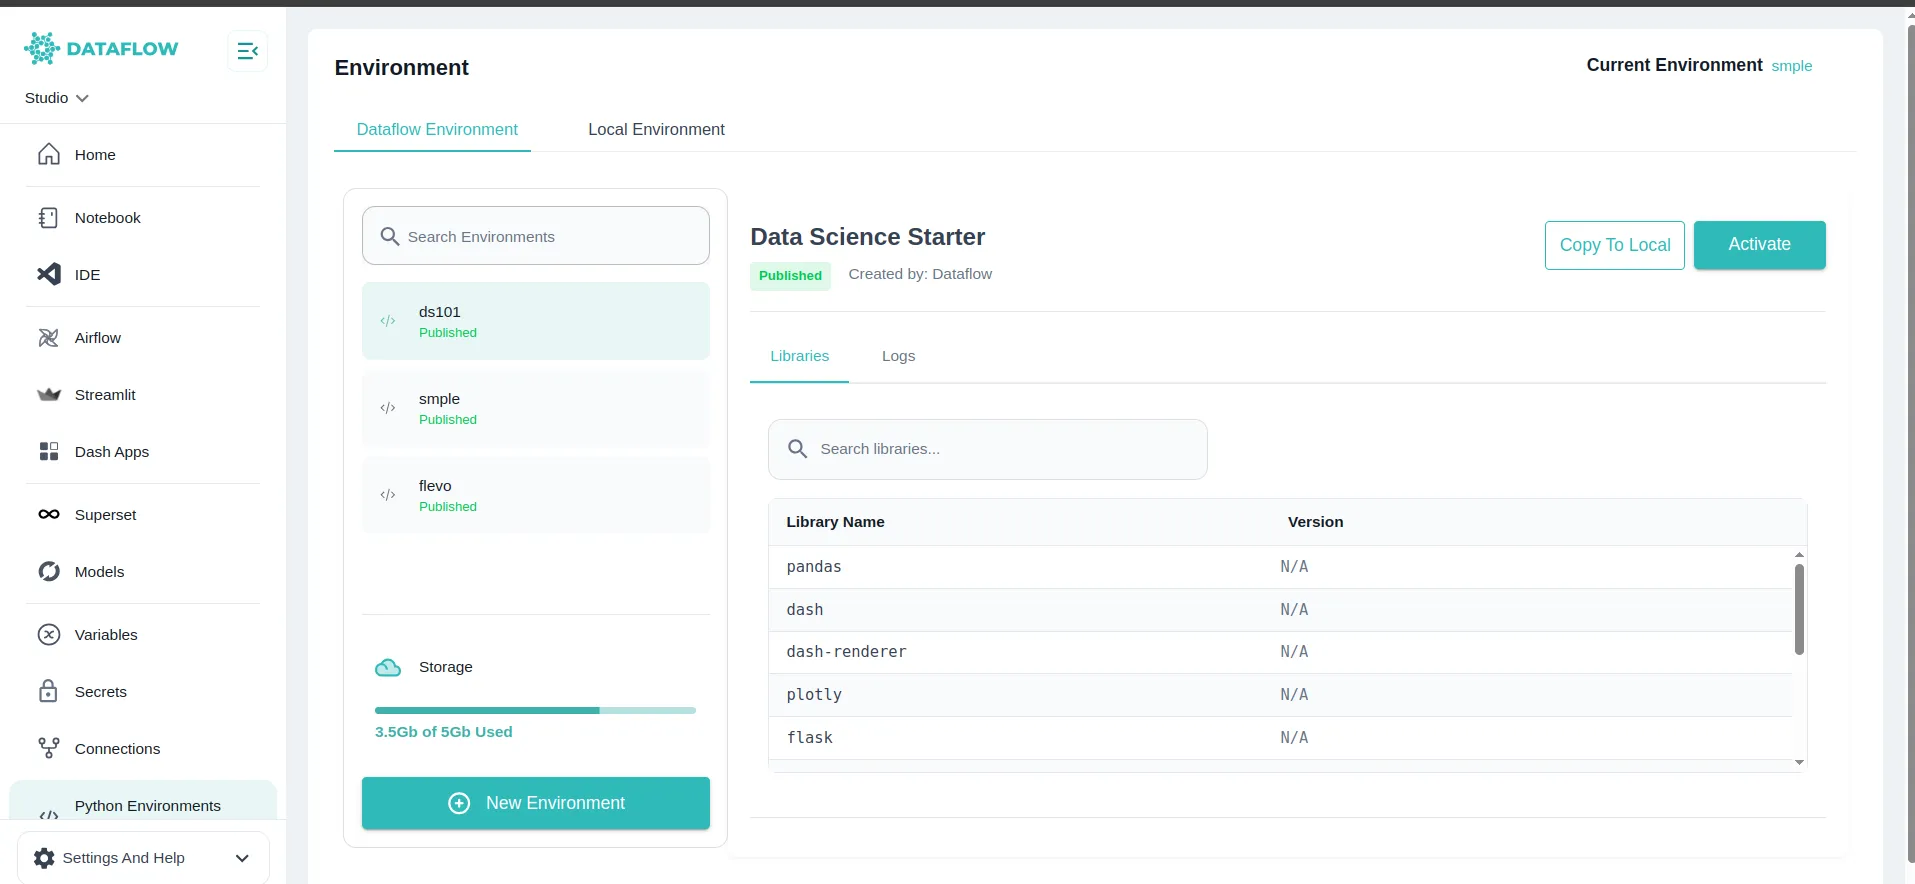
Environments
The Environments section in Studio allows you to create, build, manage, and activate custom Python environments tailored to your workflows and apps. These environments ensure consistency, reproducibility, and compatibility for your data engineering and data science projects.
What are Environments?
An Environment is a Python setup with specific libraries and versions. It defines the exact dependencies your notebooks, pipelines, and apps require.
- Avoid version conflicts
- Ensure reproducibility across team members
- Optimise resource usage by installing only what is needed
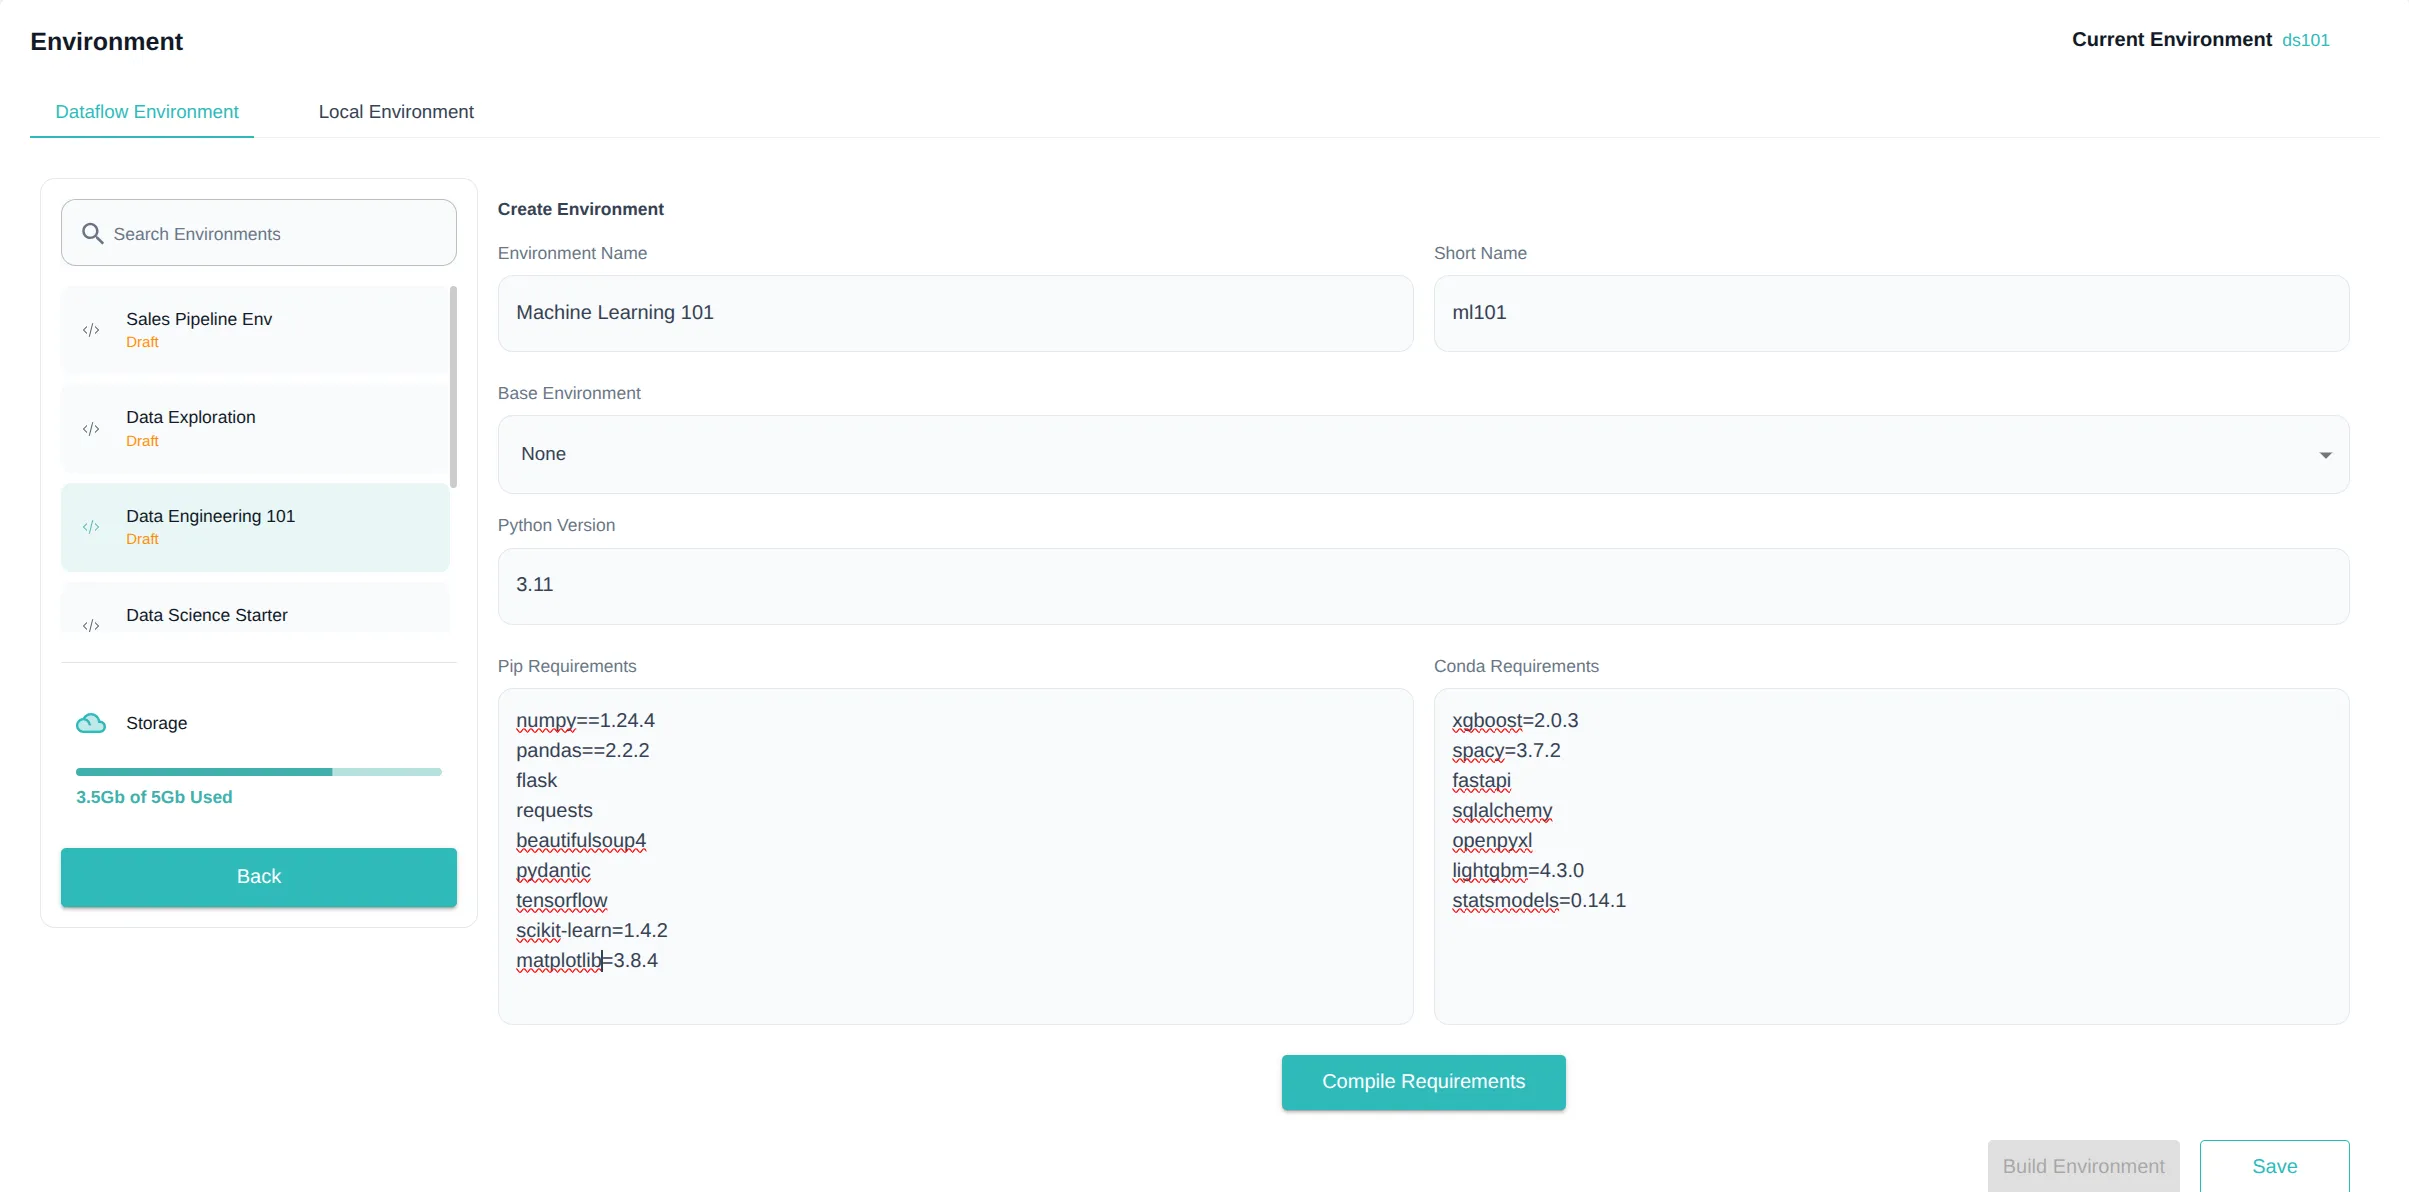
Creating a New Environment
Follow these steps to create a new environment:
- Click “New Environment”: Opens the environment creation form
- Enter Details:
- Short Name: A quick identifier and maximum length should be 5 (e.g.
mlenv) - Full Name: Descriptive name (e.g.
Machine Learning Environment) - Base Environment: Choose a base environment and if it is set as
Nonethen no base image is chosen and you need to mention python version - Python Version: Only available if no base environment (
None) is chosen
- Short Name: A quick identifier and maximum length should be 5 (e.g.
- Add Libraries:
- Conda Libraries: Mention the conda libraries that needs to be installed.
- Pip Libraries: Mention the pip libraries that needs to be installed.
Note: The requirements for both
pipandcondashould follow one of the following formats: •library•library=version•library==version•library<=version•library>=versionAlso library[dependencies] format with any of the above is allowed.
-
Click “Save”: Saves your environment in Saved state
-
Click “Build”: Initiates the build process to install the specified libraries and prepare your environment image
Note: The short name is unique across an organization. If a short name is rejected then it is used by someone else so try a different one
Environment Status
Environments will have one of these statuses:
- Saved: Initial state after creation
- In Progress: When the build process is undergoing
- Draft: Built successfully and ready for use or publishing
- Failed: Build failed due to some reason
- Published: Approved by Admin and available to all users
Environment Versioning
Studio provides versioning for environments to track changes and maintain build history:
- When you first build an environment, Version 1 is created
- A version dropdown appears below the environment name showing all available versions
- Each subsequent build creates a new version (1, 2, 3, etc.)
- Selecting a version from the dropdown displays libraries and logs specific to that version
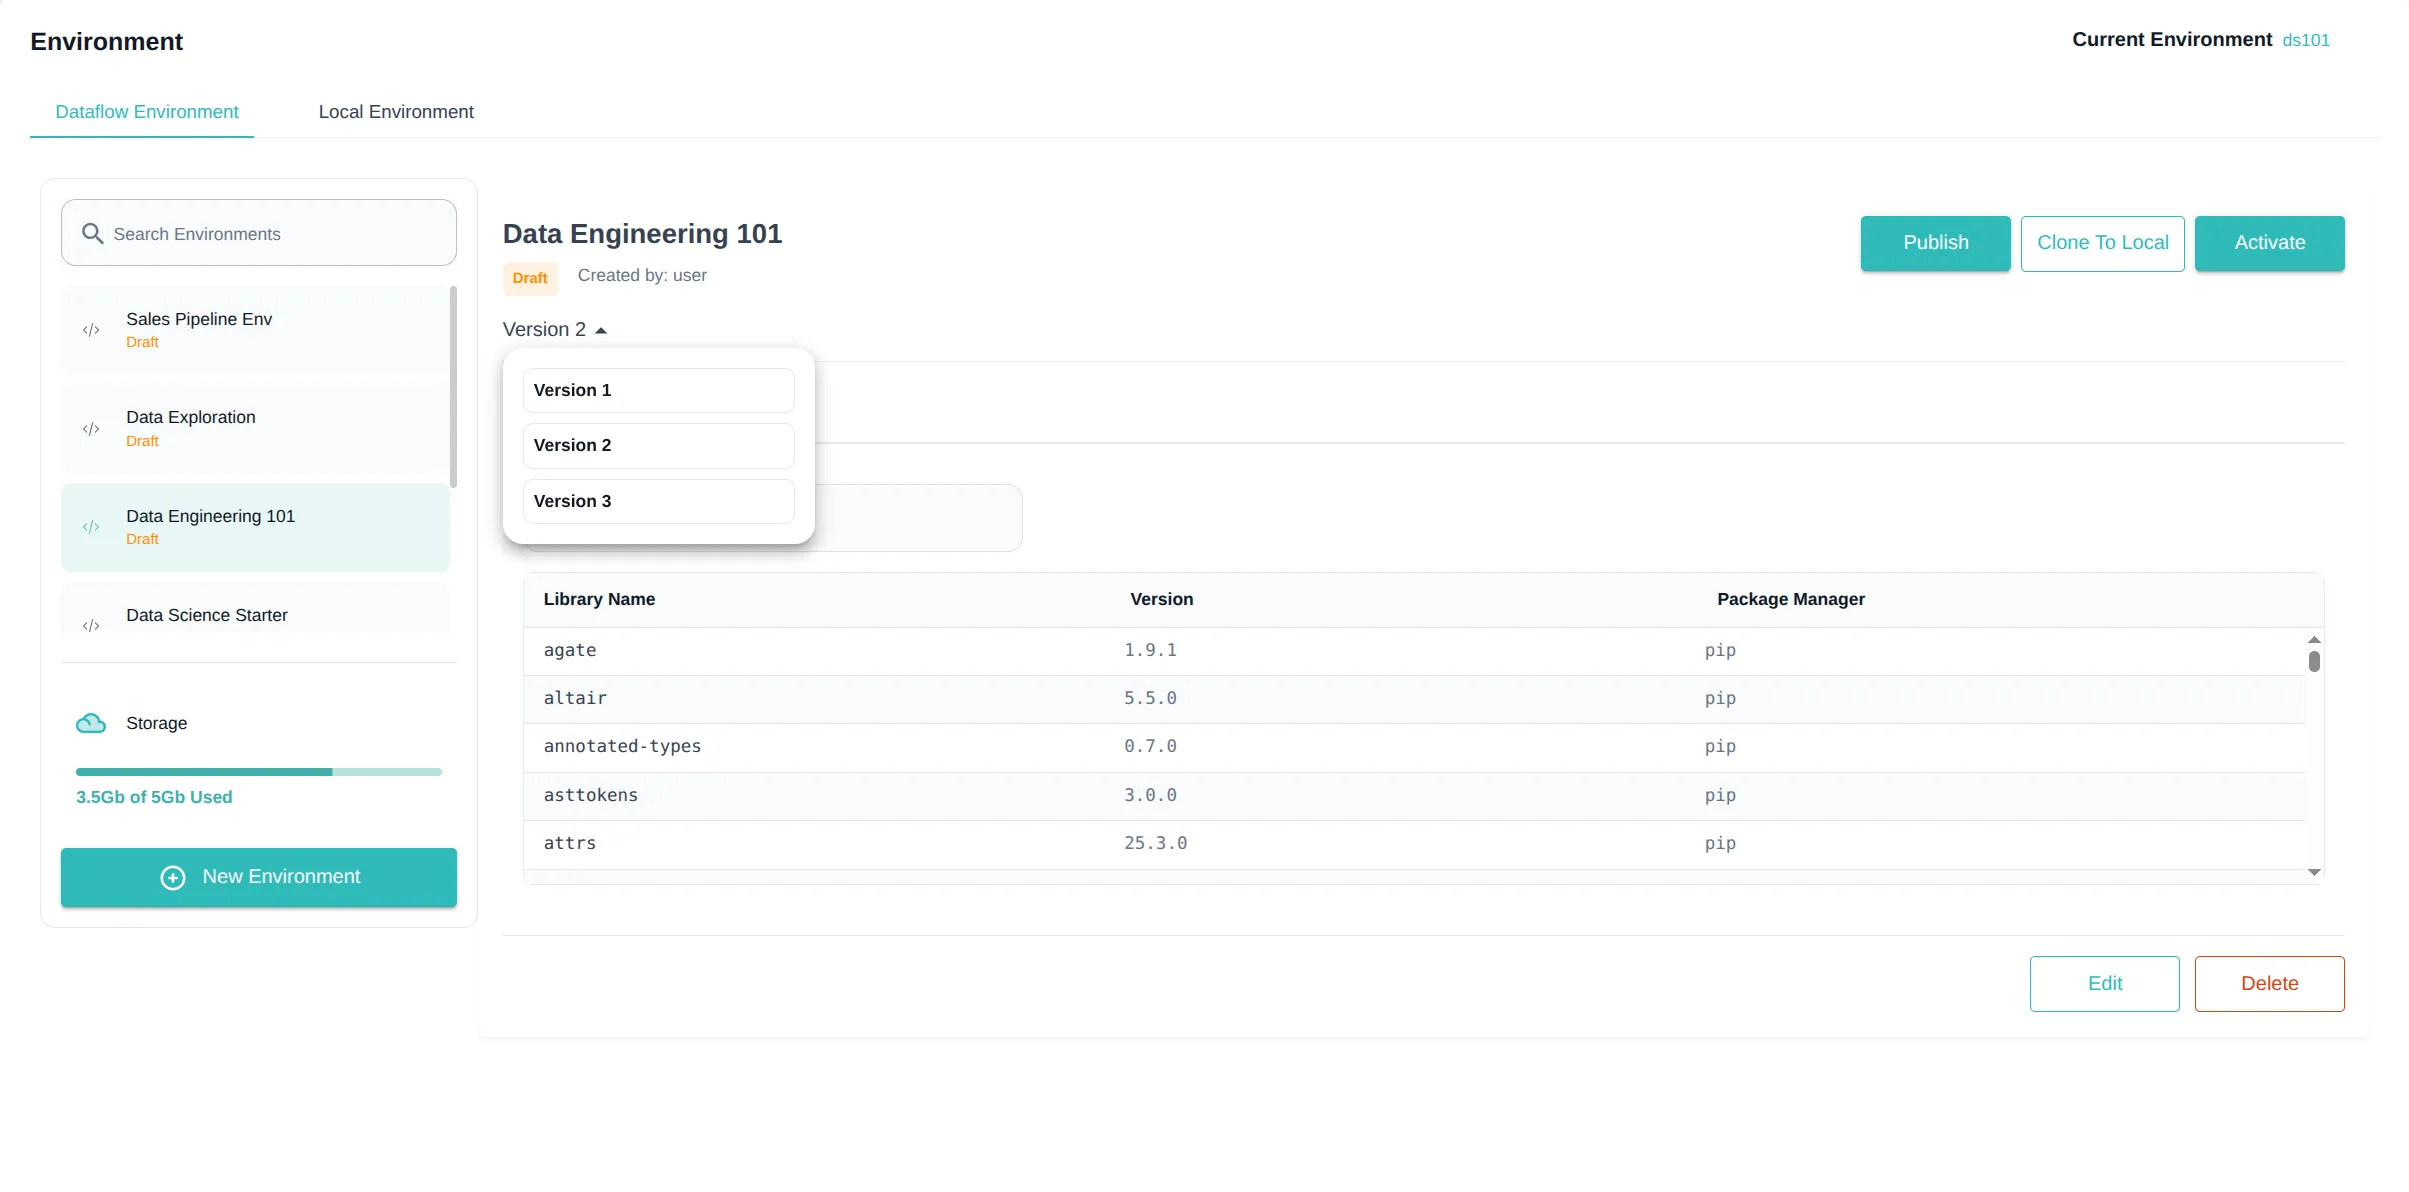
Version Behavior and Rules
- Latest Version Only: While you can view all versions for audit purposes, only the latest successful version is available for activation or publishing
- Library Management:
- New libraries in requirements will be installed in new versions
- Libraries removed from requirements may still remain in the environment
- Version changes to existing libraries are not guaranteed to take effect
- Revert Option: You can revert to a previous version, which creates a new version identical to the one you’re reverting to
- Failed Builds:
- If a build fails then the status will be shown as the same. Only the latest version can be in failed state.
- Failure logs are available for troubleshooting
- The environment remains on the last successful version for use
- When errors are fixed and built again, the same failed version will update with the new status and logs.
- Approval Process: When requesting approval for an environment, all failed versions are permanently deleted, and only the last successful draft version is submitted for admin approval
Build & Approval Process
-
After clicking Build, your environment is queued for build on backend servers
-
During building the environments’s will be in “In Progress” state and during this time it will be unusable until the build completes.
-
If the build is successful, it moves to Draft state
-
From Draft, you can:
- Use it yourself: Activate in your Studio sessions
- Submit for Publish: Sends the environment to Admin for approval
-
If Approved by Admin, it moves to Published and becomes available to all workspace users
-
If Rejected, it moves back to Draft, and you can edit or re-submit after corrections
Activating an Environment
You can activate an environment in your Studio server if it is in:
- Draft state (private use)
- Published state (shared use)
Note: Activation is not possible for environments still in Saved state or if it does not have atleast one successful build.
Checking Build Logs
For each environment, you can:
- View build logs to troubleshoot installation failures
- Monitor build progress live for long installations
Local vs Dataflow Environments
In your Notebook interface, you will see two categories:
- Local Environments: Kernels created and managed within your current Notebook server session only
- Dataflow Environments: Studio-wide environments created in this Environments page, accessible across notebooks and apps
Copying Between Local and Dataflow
- Copy to Local: Import a Dataflow Environment to use as a local kernel
- Copy to Dataflow: Promote a Local Environment to a Studio-wide Dataflow Environment for reuse and collaboration
Pip Sources Management
The Pip Sources feature in the Environment Settings allows you to manage custom Python package sources for your personal use. This is particularly useful when you need to install packages from private repositories or alternative package indexes.

Organization vs User Level Sources
Organization Level Sources:
- Configured by administrators for the entire workspace
- Automatically available to all users
- Cannot be modified by individual users
- Displayed with “(Organization)” label for identification
User Level Sources:
- Personal extra index URLs that you can add and manage
- Only visible and usable in your environments
- You have full control to add, edit, and delete these sources
- Complement the organization-level sources
What You Can Do
As a user, you can:
- View Organization Sources: See all pip sources configured by your administrator
- Add Personal Extra Index URLs: Add your own private or additional package sources
- Edit Your Sources: Modify the name and URL of sources you created
- Delete Your Sources: Remove sources you no longer need
Managing Your Pip Sources
To Add a New Source:
- Click “Add URL” in the Extra Index URLs section
- Enter a Name for easy identification (letters, digits, hyphens, and underscores only)
- Enter the URL of your package index (e.g.,
https://your-private-repo.com/simple) - Click “Add” to save
To Edit an Existing Source:
- Click the pencil icon next to the source you want to edit
- Modify the name or URL as needed
- Click “Update” to save changes
To Delete a Source:
- Click the trash icon next to the source you want to remove
- Confirm the deletion in the dialog that appears
Important Notes
- Only sources you created can be edited or deleted
- Organization sources are read-only and managed by administrators
- Changes to pip sources are automatically applied to new environment builds
- Your personal sources are private and not visible to other users
Summary
- Create a new environment by defining name, base image, and libraries
- Save and Build to install dependencies
- Check build status and logs for success or errors
- Activate the environment in Studio once in Draft or Published state
- Submit for Publish to share with all users upon Admin approval
- Manage local and Dataflow environments for flexible development workflows
By managing your environments effectively, you ensure robust, reproducible, and optimised workflows across your data projects. Explore the next sections on Connections and Secrets to integrate external data systems securely within your environment.